Showing posts with label Recipes. Show all posts

Thursday, 5 July 2018

Monsoon Special - Phodshi chi Bhaji

Phodshi and Phodshi chi Bhaji
In the first few showers of rain several plants and other vegetation spring up with their tender and bright green leaves in a complete splendor, as though showing their gratitude towards the relief from the summer heat. Spinach, small tender fenugreek, drumstick leaves, dill, Malabar spinach (mayalu in Marathi, wali in Konkani), amaranth (math) both red & green are a few greens which are in their best form in the early monsoon.

During monsoon our body becomes vulnerable to infection and water born diseases. Fruits and vegetables like pumpkins, broccoli, spinach, lettuce, sweet potatoes, corn, eggplant, cauliflower, apples, beets, ginger, garlic, brussel sprouts etc. are good to consume during this season.

Surprisingly or shall I say its Nature’s Gift to mankind that it produces few wild weeds and vegetable which are grown only during monsoon. Wild weeds like Shevala, Taikele (Tora), Phodshi (Kooli/Peva/Mulshi/Dongras) are very commonly found in patches of forest and hillside. They are known to have some medicinal properties that increases the immunity level and hence recommended to consume during this season. As these weeds are available only during monsoon one should grab the opportunity & reap the benefits of Nature’s Bounty!


Phodshi 

I would like to share a very tasty and easy recipe of Phodshi (Kulli, Peva) chi Bhaji.

Ingredients:
  • Phodshi - 2 bunch
  • Onion – 1 large onion 
  • Garlic – 14 garlic cloves
  • Green Chillies – 3 – 4 
  • Mustard Seeds – 1tsp 
  • Cumin Seeds – 1 tsp
  • Curry Leaves – few
  • Asafoetida (hing) –¼ tsp
  • Turmeric –½ tsp
  • Coriander-Cumin powder –½ tsp
  • Chilli powder –¼ tsp
  • Besan – 1tbsp
  • Oil – 1 tbsp
  • Salt to taste
  • Fresh scraped coconut – 1- 2 tbsp


Phodshi chi Bhaji

Method:


1. Wash the phodshi under running water properly. 
2. Cut 1inch from the root and discard it.  
3. Then finely chop rest of the phodshi (including the white part) and keep aside.
4. In mortar and pestle coarsely crush garlic and chillies. 
5. Slice the onion finely and keep aside.  
6. In a kadai heat oil, add mustard seeds and cumin seeds.
7. When they start sputtering add crushed garlic, chillies, curry leaves and half of the asafoetida (hing).
8. Now add finely chopped onions and fry till the onions turns translucent.  
9. Then add turmeric, coriander-cumin powder and chilli powder. 
10. Fry for 5 seconds and add the chopped Phodshi, salt to taste and remaining half of asafoetida (hing).
11. Mix well, cover and cook for 3 mins on low flame.  
12. Once the Phodshi is half cooked sprinkle besan on the top and cover once again and cook for 5 mins. 
13. Then mix all and cook for 2 mins or till the vegetable is cooked however has little bite or crunch intact. 
14. Finally, add freshly scraped coconut (reserve some for garnishing) and mix well. 
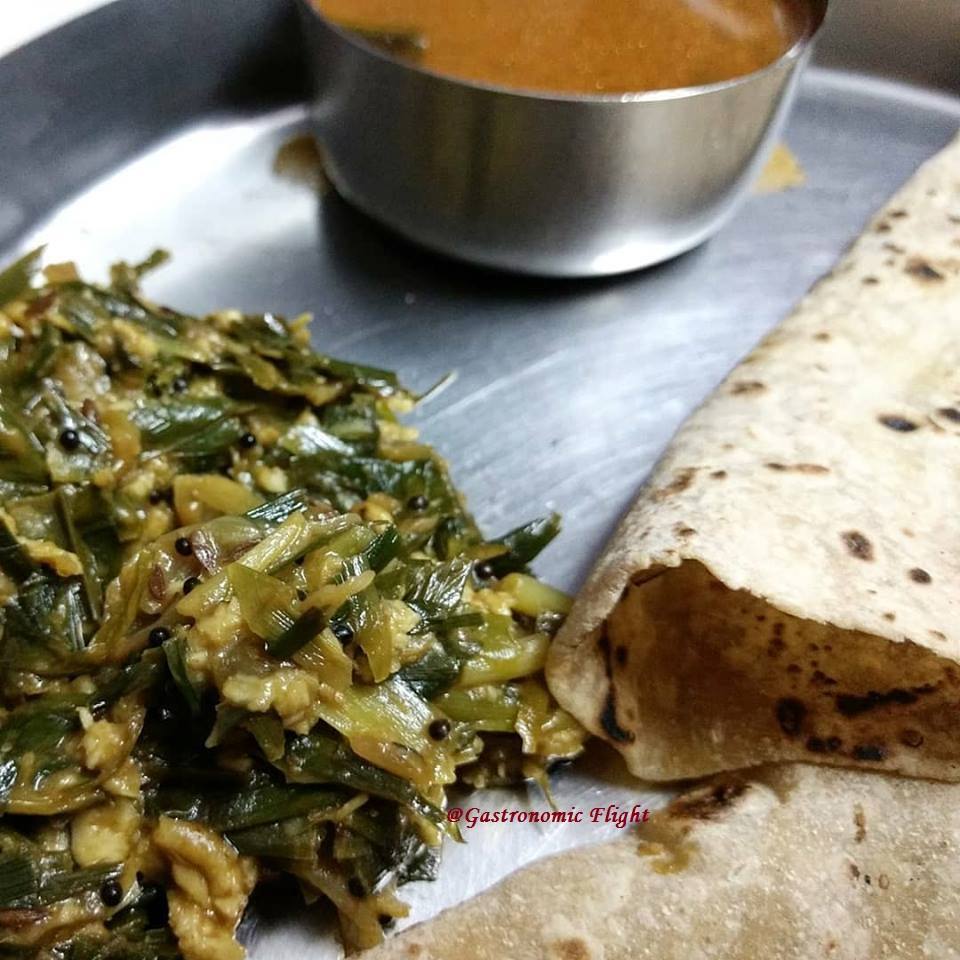
15. Garnish it with remaining fresh coconut and serve hot with chappati or phulkas.


Phodshi chi Bhaji with Chappati


Please try this recipe and share your comments below:

You can also try Phodshi Amboda (Pakoda) recipe from my previous blogpost. Please click here for the recipe.


Saturday, 9 June 2018

Health is Wealth ... Tasty Whey Soup with Paneer


Whey Soup

These days people have become more and more health conscious and the awareness of the ingredients have increased. Before consuming anything people are doing a lot of research about the nutritive value of a particular ingredient. With the increasing health awareness people have consciously changed their eating habits from refined and junk food to organic and whole natural food. This has now become a Healthy Food Trend.

Particular the fitness freaks, who actually count their nutrition and calories intakes are eating wisely. People who follow diet plan believe that protein-rich diet helps in weight loss. The concept of eating protein-rich food has now become an in these days in order to maintain the health and to stay in shape. In fact, people have now started experimenting at home cooking in order to keep themselves fit, according to Godrej Food Trends Report 2018.

When talking about proteins paneer is the most common and favorite amongst the vegetarians. And if it’s a homemade paneer; then it's like “Sone pe Suhaga"


Paneer

The milky liquid that is left behind while making the paneer is called Whey. Commercially, this whey is processed & formed into a powder and sold in the market as Whey Protein Powder. Whey protein is considered as a complete protein as it contains all 9 amino acids. This is highly recommended in health and slimming industry as a functional food for its nutritional properties. Research says that this has possible benefit for weight loss and lowering cholesterol level. It’s also been observed that whey improves immune response in children with asthma. According to research published in the International Dairy Journal, found that whey beverages help in reducing blood pressure in the patient with high blood pressure.

Whey

However, at home, it mostly ends down the drain or we either use it for kneading dough or in making dal. This understated whey is actually a power pack house of protein, calcium, and minerals. It also helps in stimulating insulin release. So next time before you wash that nutrition down the drain, think of amazing benefits that you will be wasting.

So, in order to use this magical milky liquid,  I would like to share the whey soup recipe. This would add more value to your intake. This is a very easy tasty recipe with all the basic ingredients which are very easily available in our kitchen.

Paneer and whey


Paneer and whey


So, here is a very easy whey soup recipe for all of you to slurp in …

Whey soup with paneer:

Ingredients:

  • 2 cup whey
  • 11/2 cup vegetable or chicken stock
  • 1tsp oil or ghee
  • 1-inch grated ginger
  • 1tsp jeera
  • 1tsp crush pepper
  • 2-3 green chilies chopped
  • few pieces of paneer cubes
  • Salt to taste
  • 1 tbsp finely chopped coriander
  • 1 tbsp milk or cream (optional)


Whey Soup with Paneer
Method: 
  1. Heat oil or ghee in add jeera, when it splutters add grated ginger and chopped chilies.  
  2. Pour in the whey and vegetable or chicken stock. 
  3. Then add salt to taste and crushed pepper. 
  4. Bring to a rolling boil for 5 mins.
  5.  Now add the chopped coriander and paneer cubes. 
  6. Let it simmer for another 1 min. 
  7. Garnish it with finely chopped coriander and a dash of cream or milk (optional). 
  8. Serve hot.


Note: This post is a part of the Godrej Food Trends Blogging Contest hosted by Fashionablefoodz in association with Vikhroli Cucina and should not be repurposed, republished or used otherwise. The content herein is owned by the blogger. Godrej Food Trends Blogging Contest, Fashionablefoodz or Godrej is not responsible for any kind of Infringement caused.

This post is in associated with Godrej Food Trends Blogging Contest #GFTR2018 #GodrejFoodTrends2018


Sunday, 23 April 2017

Make-over to the leftover rice - 'Rice-Tomato Omlette'

Rice-Tomato Omlette
We ladies normally have the ingrained habit of giving the leftover food a make-over. This is one such make-over of leftover rice, which reminiscing me of my granny. 

My granny (amma, we used to call her) once happened to visit her friend on Monday, which was her weekly fasting day and this dish was accidentally served to her. Amma, who herself was an excellent cook, couldn’t figure out that the dish had cooked rice in it.  Upon asking for the recipe, she realized that her fast was broken as there was rice & onions added in it. 

Nevertheless, though her fast was broken, she loved this omelette so much that this new recipe sought a place in our regular menu. So, she passed on this recipe to my mother and now on to me. I have added my innovation to the recipe. I am very glad to share this to all of my readers. 

I am sure once you try this, it will be a part of your regular diet. 


Rice-Tomato Omlette 

Ingredients:
Rice-Tomato Omlette
1 cup cooked rice
1 cup besan
1 tbsp rice flour
1 tomato chopped
1 onion chopped
1-2 tsp chilli powder (as per taste)
½ tsp turmeric powder
1 tsp garam masala powder
1 tsp garlic-ginger-green chilli paste
salt to taste
1-2 tsp oil for drizzling
few coriander leaves


Method: In a bowl mix besan, rice flour, chilli powder, turmeric powder, garam masala powder, salt, garlic-ginger-chilli paste together. To this add cooked rice, tomato, onion and coriander leaves and mix well.  Add water to form a batter. Adjust water quantity to form dosa batter like consistency.
Heat tawa and drizzle few drops of oil on the hot tawa and spread it well on the tawa. Pour the 1 ladle batter on the hot tawa and spread like thick dosa. Cover and cook for 1 min or till the side edges turn slight brown. Now drizzle few drops around the edges and cook for few seconds. Flip this omlette/dosa on the other side and cook it golden brown. Once golden brown on both side its done and ready to serve. Serve this hot, taste better with butter, tomato ketchup/ chutney.
One of the best ways to use your leftover rice. It’s like “Best out of Waste”.

Do try this and please share your comments and feedback. 


Monday, 31 October 2016

Easy-Pesy Diwali Snack/Faral - "Champakali"

When Diwali is right at the corner, we all start preparing for this festival of light. Along with the regular traditional Diwali snacks or faral, every year I ensure to make something with a twist. So this year the regular simple and easy Diwali faral ‘Champakali’ was made with double colour, which gave it a real flower bud look. In fact even I was surprised with the result. It not only looked beautiful but also tasted delicious.  The best thing of this Champakali is that it only looked complicated but actually it's so easy to make that even a child can make it. So I would love to share my easy, tasty and colourful Diwali Faral /Snack ‘Champakali’. In fact it one of my best Diwali Snack dish.


Champakali – Serving 14 pieces – Savory version  

Ingredients:

1 cup – maida
1 tbsp – ghee
Salt to taste
1-2 tsp – chilli pd
1-2 tsp – turmeric pd
1/4 tsp - ajwain or carom seeds (optional)
water for kneading the dough
few drops of green food colour
Oil for frying

Method:

1) Take maida in a parat or bowl.
2) Add salt to taste and mix well.
3) Heat 1 tbsp ghee.
4) Add this hot ghee to the maida.
5) Mix well. Initially use spoon to mix, as the ghee is hot and then use your finger tips. Mix till it resembles the texture of breadcrumbs.
6) Now divide this mixture in two parts.
7) In one part add turmeric powder. Mix well . This mixture will be your yellow dough.
8) To the second part add chilli powder, ajwain/carom seeds (optional) and mix well. This mixture will be your red dough.
9) Knead them both separately with warm water to form a firm dough.
10) Cover them with wet cloth and keep aside for 10 mins.
11) Form small balls and roll them into puris. You can roll out all puris at a time and keep aside and then start forming the champakali. However keep the puris covered with wet cloth.


To form the champakali: 

12) On a flat surface place the yellow puri and on top of it place the red puri. Even if the puris are uneven, its ok. You need not worry. 

13) Make vertical cuts on the puris, keeping  1/2 to 1”inch diameter space all over.


14) Hold both the ends and roll these puris together. Twist it tightly to form a Kali shape. 

15) Press both the tips and give it a proper kali or bud shape. 

16) Apply green food colour to one of the tips to give it a look of sepals and an real bud or kali.

17) Now heat the oil for frying and deep fry them on medium flame. 

18) Let it cool and then you can store them in a air-tight container 
19) Serve these cute little Champakali for Diwali or any festive season.
20) The above recipe is a savory version of Champakali.
**********************************************************************************************************************************************************************************************
Tips for Sweet Version:  


a) If you want a sweet version then omit chilli pd and replace it with red food colour or beetroot juice and knead the dough. Please note by adding beetroot juice, it will give a different shade of red colour, but will add nutritive value.

b) For sweet version instead of salt to taste, just add a pinch of salt or can even omit it completely.

c) Make sugar syrup with 1 part of sugar to 2 part of water.  Boil till it reaches ½ - 1 thread consistency. Add cardamon powder and few strands of saffron. While the syrup is still warm add these champakali and let it soak for a 30 second – 1 mins. And remove it with slotted spoon to drain out the excess syrup.  Keep aside till it cools down completely. Now it's time to store or serve.


************************************ Champakali *********************************************

Ingredients: Serving 14 pieces – Savory version

1 cup – maida
1 tbsp – ghee
Salt to taste
1-2 tsp – chilli pd
1-2 tsp – turmeric pd
1/4 tsp - ajwain or carom seeds (optional)
water for kneading the dough
few drops of green food colour
Oil for frying

Method:

1) Take maida in a parat or bowl.
2) Add salt to taste and mix well.
3) Heat 1 tbsp ghee.
4) Add this hot ghee to the maida.
5) Mix well. Initially use spoon to mix, as the ghee is hot and then use your finger tips. Mix till it resembles the texture of breadcrumbs.
6) Now divide this mixture in two parts.
7) In one part add turmeric powder. Mix well . This mixture will be your yellow dough.
8) To the second part add chilli powder, ajwain/carom seeds (optional) and mix well. This mixture will be your red dough.
9) Knead them both separately with warm water to form dough.
10) Cover them with wet cloth for 10 mins and keep aside.
11) Form small balls and roll them into puris. You can roll out all puris at a time and keep aside and then start forming the champakali. However keep the puris covered with wet cloth.

To form the champakali

12) On a flat surface place the yellow puri and on top of it place the red puri. Even if the size and shape of both puris differs, its ok. You need not worry.
13) Make vertical cuts on the puris, keeping  1”inch diameter space all over.
14) Hold both the ends and roll these puris together. Twist it tightly to form a Kali shape.
15) Press both the tips and give it a proper kali or bud shape.
16) Apply green food colour to one of the tips to give it a look of sepals and feel like a real bud or kali.
17) Now heat the oil for frying and deep fry them on medium flame.
18) Let it cool and then you can store them in a air-tight container
19) Serve these cute little Champakali for Diwali or any festive season.

Hope you will enjoy making this in your kitchen. Please feel free to leave your comments and suggestions below ....


Offer Deal:

Amazon offers Upto 50% off on Men's watches. To avail the discount Click here
Valid till : Offer lasts

Flipkart Offer Minimum 25% off on mamy poko and pampers. To avail the discount Click here
Valid till : Offer lasts

Voylla Offer Upto 20% off on North Wedding Jewelry. To avail the discount Click here
Valid till : Offer lasts

Nykaa Offer upto 30% off on Herbal productsTo avail the discount Click here
Valid Till: 6th November 2016 

Voonik Offer Upto 50% off on Stylish Footwear. To avail the discount Click here
Valid till : Offer lasts

Shoppers Stop Offer Upto 50% off on Women's handbags. To avail the discount Click here
Valid till : Offer lasts

Thursday, 4 August 2016

" Sooi " - Traditional Curdled Milk Sweet Dish


Sooi
What do you do when you notice that while boiling the milk it begins to curdle???  You may say “Simple … make paneer or cottage cheese.  And then make ‘n’ number of recipes from that cottage cheese.”  Yep you guys are right but then what about the whey?  Either it goes down the drain or used in dal or in make chappati dough or in soup.  However, the whey is sour and it changes the taste of the final dish.  Also, some may / may not even like the taste of it.  So in short, half of your curdled milk is kind of waste. 

You will be glad to know that I have got a recipe, where you can make the best use of the ‘whey’, which normally get wasted. I am posting a very interesting traditional sweet dish for all my readers wherein every ounce of the curdled milk gets used without any wastage.  It is made using only 3 basic ingredients, Yes, you hear me right; only 3 ingredients and the end product is absolutely YUM!!! 

Basically, I am Not a person with a sweet tooth but this one is my favorite.  I remember as a child I would get excited whenever the milk used to get curdled, as my granny and mom would whip up this delectable sweet dish called ‘Sooi’.  This is our family’s recipe and today I would like to share it with you. ‘Soi’ is a simple sweet dish of our Chitrapur Saraswat Brahmin community.

‘Sooi’ is made when you first notice the sign of milk getting curdled. Do not let it curdle completely like paneer. The moment you realize that the milk is about to curdle/split/ spoil, you need to switch off the flame and start gathering ingredients for Sooi.  As I said you only need 3 basic ingredients and you are way to go ….

Traditionally in my house this is made only when the milk get naturally curdled. The taste may differ slightly if you curdle the milk purposely by adding any souring agent.


All that you need for this recipe is ….

Generally we make it when the milk splits naturally. Incase you want to curdle the milk, then first heat the milk and bring it to a boiling point. Once it’s about to boil add lemon juice/curd/vinegar(souring agent of your choice). Heat for a 1 min and switch off the gas.

If using naturally spilt milk follow the procedure from here. Now transfer this milk in a heavy bottom pan or kadai.  Add freshly scarped coconut, jaggery and a small pinch of salt (optional) to the milk.

Mix all ingredient

Mix it well and bring it to a boil. Keep stirring continuously for the first 5 -10 min.  Then you may stir occasionally. Make sure that it does not stick to the bottom.


Boil the mixture

Cook this till the liquid almost evaporates.  This mixture should be semi-dry.


Semi- Dry Consistency

Mix well. That's it ... Simple isn't !!!! The delicious Sooi is ready to be served. Serve it hot or cold, it taste yummy at both the temperature whether cold or hot.


**********************************************************************************************************************************************************************************************

Sooi Recipe 


Ingredients:

  • 500 ml curdled milk or 
  • 500 ml milk & 1 tbsp lemon juice/curd/vinegar (incase you want to curdle the milk)
  • 1 cup freshly scraped coconut
  • 3/4 cup jaggery (or as per taste)
  • Salt a small pinch (optional)
Sooi 


Method

Generally we make it when the milk splits naturally. Incase you want to curdle the milk, then first heat the milk and bring it to a boiling point. Once it’s about to boil add lemon juice/curd/vinegar(souring agent of your choice). Heat for a 1 min and switch off the gas. And then follow the method as below.

If using naturally spilt milk follow the procedure from here. Now transfer this milk in a heavy bottom pan or kadai. Add freshly scraped coconut, jaggery and a small pinch of salt (optional) to the milk.

Mix it well and bring it to a boil. Keep stirring continuously for the first 5 -10 min. Then you may stir occasionally. Make sure that it does not stick to the bottom. Cook this till the liquid almost evaporates. This mixture should be semi-dry. Mix well and serve hot or cold. 

Tips:
  • You can enhance the favour by adding ½ tsp of cardamom powder or ½ tsp nutmeg powder, it's optional. This taste equally delicious even without any favoring spices.
  • Adding a small pinch of salt to a sweet dish enhances the favour. 
  • You may also add some pieces of almonds or pista. However traditionally it's made as per the recipe mentioned above, without adding any dry fruits.

Try this recipe and please leave your valuable comments below..... hope you enjoy it.


For all the foodies: 
KhauGaliDeals is offering 20% flat Off on All Deals in August
Please click here for more information.
Offer Valid till 31st August 2016

Food Panda is offering Flat 100 off on 300 
Coupon Code : FPAD100
Flat 40% off on your first order
Coupon Code : FPAD40
Please click here for more information.

Offer Valid till 31st August 2016


Thursday, 14 July 2016

Gift of Nature - Phodshi - Phodshi Amboda (Pakoda) Recipe


Phodshi Amboda (Pakoda)
With the early showers of rain, we notice the transition of fruits and vegetable in the markets. The last lot of summer produce is on the verge of exhaustion while the commencement of new monsoon crop is just on its way.
The king of fruits mangoes are also seen diminishing gradually, except for some selected late varieties like Totapuri (South India & Maharashtra), Fajri (U.P), Fernandin (Goa & Mumbai), Mulgoa (South India), Neelum (Tamil Nadu), Samarbehisht Chausa (North India).
Along with the remnants of summer fruits, the monsoon varieties like plums, cherries, peaches, pears, fresh dates etc mark their arrival.

In the first few showers of rain several plants and other vegetation spring up with their tender and bright green leaves in a complete splendor, as though showing their gratitude towards the relief from the summer heat. Spinach, small tender fenugreek, drumstick leaves, dill, Malabar spinach (mayalu in Marathi, wali in Konkani), amaranth (math) both red & green are a few greens which are in their best form in the early monsoon.
During monsoon our body becomes vulnerable to infection and water born diseases. Fruits and vegetables like pumpkins, broccoli, spinach, lettuce, sweet potatoes, corn, eggplant, cauliflower, apples, beets, ginger, garlic, brussel sprouts etc. are good to consume during this season.
Surprisingly or shall I say its Nature’s Gift to mankind that it produces few wild weeds and vegetable which are grown only during monsoon. Wild weeds like Shevala, Taikele (Tora), Phodshi (Kooli/Peva/Mulshi/Dongras) are very commonly found in patches of forest and hillside. They are known to have some medicinal properties that increases the immunity level and hence recommended to consume during this season. As these weeds are available only during monsoon one should grab the opportunity & reap the benefits of Nature’s Bounty!
Phodshi (Peva/Kooli/Mulshi/Dongras)

The other day while I was in the market I noticed Phodshi at the vegetable vendors. Since this is the best & only time to consume them, I bought some and planned to prepare something interesting.
The heavy downpour triggered me to cook this interesting recipe - Phodshi Amaboda (Pakoda). The torrential rain outside and a hot piping Amaboda (Pakoda) is a perfect combination. It’s like match made in Heaven!
Phodshi (Peva/Kooli/Mulshi/Dongras)
A couple of years back this recipe was suggested to me by my uncle Nagaprasad Kundapur Maam. I have added my twist and made some changes and taken it to another level. The Amaboday turned out to be so yummy and mouthwatering, that the moment I served them, they were almost gone. Fortunately, I was able to reserve some for photographs. 
Today I would like to share my version of Phodshi Amaboda recipe. So that all my readers can make the best use of this Gift of Nature. 

******************************************************************************************************************************************************************************************

Phodshi Amaboda

Phodshi Amboda (Pakoda)

Ingredients:
  • Phodshi – 1 bunch
  • Chana Dal – 1 cup
  • Rice  - ½ cup
  • Chilli powder – 2 tsp or as per taste
  • Turmeric – 1/2 tsp 
  • Jeera – 1 tsp
  • Tamarind – small marble size
  • Jaggery – 1 – 2 tbsp or as per taste
  • Asafoetida (Hing) – ¼ tsp
  • Ajwain – 1 tsp
  • Soda bicarbonate – a pinch (optional)
  • Salt as per taste.

 Method : 
Soak chana dal and rice separately for atleast 4 – 5 hours or maximum overnight.  Then drain the water and leave to semi-dry.
Meanwhile wash the Phodshi 4 – 5 times in water properly, since they as wild weed, they have lots of mud on them.  The green leaves has a tough single twine, which is inedible, discard this twine. Mostly the twine is already been discarded/removed and then kept for selling, but still it’s always better to check before using it in any recipe.
Chop these roughly (including green leaves and white bulbs) and keep it aside.  Heat oil for frying in a Kadai.
Grind the soaked chana dal, rice, chilli powder, turmeric, jeera, tamarind, jaggery, asafoetida and salt.  Make slightly coarse paste. Now add the ajwain and the chopped phodshi and mix it well. Add the pinch of soda bicarbonate and on top of it pour 1 -2 tsp of hot oil.  Mix this well. 
Make small round balls and deep fry them till golden brown. Alternatively you can form small flat patty and shallow fry in a frying pan or tawa like Tikkies. If shallow frying, ensure you fry on both the sides till golden brown.
Serve hot with any chutney or sauce of your choice. I had made a special pakoda chutney to serve with this. Special pakoda chutney recipe coming soon in my next blog. However, these taste yummy even without any sauce or chutney.
Pls try this recipe and make best use of produce that Mother Nature is showering on us. And be free to write your comments and feedback below.

Burger King offers 50% off on Veg and Non-Veg Burger Combo Meals.
Valid till offer lasts
To avail this offer 
Click here

Tuesday, 5 July 2016

Immunity Booster - Must during the Rainy Season

Immunity Booster
After a long long scorching summer, finally it’s raining ....Yehhhh …. The smell of the damp soil and damp road, makes my heart goes Gaga J.  It reminds me of my childhood days when we used to get wet and play in the rain, make paper boats and let them sail in the flowing water.  It made me reminisce how we would collect those rain-drops and splash them on each other and giggling at every splash.  Also, we would annoy the elders by jumping into the puddle and getting our feet dirty.  Those were the carefree days, no worries, no stress (beside studies & exams). Playing all throughout the day till our energy gave away …. While we would enjoy playing in the rain, I always remember my granny and mom would warn us by saying “Kids don’t play too much in the rain, or else you will fall sick”. But we kids as usual would turn a deaf ear.  Such warnings were mostly accompanied by a list of other do’s & don’t ensuring that we don’t eat outside food or drink unpurified water etc etc… Monsoon was undeniable the season of too many restrictions that as kids we had to endure.

Now reaching adulthood, I’ve realized the quintessential truth behind the rules n regulations imbibed on us by our elders. 

Sitting by my window sill reveling myself to the downpour, I let few raindrops fall on my face and enjoyed the feeling of them trickling down.  The sound of the rain is like music to the ears and a sigh of relief, especially after this long hot summer.  Watching some kids playing in the rain, I wish to reverse the time and re-live my childhood days by drenching myself in the rain again.

Immunity Booster


Nevertheless, as we Welcome the most awaited RAIN after the blazing summer, lets not forget that the water borne diseases also comes along with it uninvited. May it be an adult or a kid, everyone is likely to be susceptible to them.

However, there are always some precautionary measures which need to be taken to safe-guard ourselves.

While I was thinking, I recollected seeing one such remedial recipe on a cookery show.  They called it an ‘Immunity Booster’.  I immediately had the urge to make it and serve it to my family.  This drink is so tasty, that you would want to have daily. Besides its so very easy and quick to make.

Here is the recipe :

Immunity Booster: 

Immunity Booster

Ingredient:
  • Kiwi – 1 whole
  • Plum – 2 -3 
  • Slices of pineapple - 4-5 slices
  • Sugar – 2 tsp or as per taste
  • Salt – as per taste
  • Black salt – as per taste (optional)
  • Ginger – 1”inch
  • Mint leave – 8 – 10 leaves

Method: 

Wash kiwi and plum. Remove the peel of the kiwi. Chop all fruits and put them in the mixer jar.  Add sugar, salt, black salt (optional), ginger, mint leaves and grind it with little water. 

Voila!!! Your Immunity Booster Drink is ready to serve. 

Serve this in a glass with few mint leaves. You may add some ice according to the weather. 

Its as simple as that :) and you are all set to fight those uninvited diseases.


Do try this recipe and feel free to leave your comment below ... Please give your feedback in comment below